≡


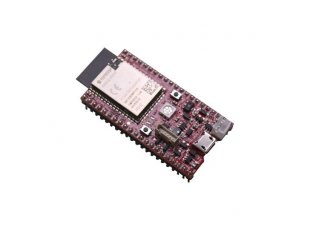
ESP32-S2-DevKit-Lipo-USB


ESP32-S2 development board with USB host and device functionality USB-OTG
ESP32-S2-DevKit-LiPo-USB is OSHW certified Open Source Hardware with UID BG000107
Select Product Variant
- ESP32-S2-DevKit-Lipo-USB
- ESP32-S2-DevKit-Lipo-USB-EA
- ESP32-S2-WROVER-DevKit-Lipo-USB
- ESP32-S2-WROVER-DevKit-LiPo-USB-EA
| Price | 6.95 EUR |
|---|---|
| 10 - 49 pcs | 6.60 EUR |
| 50 - 10000 pcs | 6.26 EUR |
ESP32-S2 is a highly integrated, low-power, single-core Wi-Fi Microcontroller SoC, designed to be secure and cost-effective, with a high performance and a rich set of IO capabilities.
Compared to ESP32, ESP32-S2 has only single core and misses the Ethernet and Bluetooth connectivity, but has much more GPIOs which were missing in ESP32.
The typical use is for WiFi enabled devices. ESP32-S2 supports low power modes including deep sleep that goes as low as 20uA.
ESP32-S2-DevKit-Lipo-USB board is pin-to-pin compatible with Espressif ESP32-Saola-1, but adds Li-po battery charger and the ability to work on Li-Po power when external power supply goes missing, allowing handheld applications and increasing availability and reliability.
ESP32-S2-DevKit-Lipo-USB uses the build-in USB interface and can work as host and device, even when powered by the Li-Po battery.
All components used are with industrial grade oprating temperature -40+85C. Variants:
ESP32-S2-DevKit-Lipo-USB-EA comes with ESP32-S2-WROOM module with u.FL connector and 3dB external antenna.
ESP32-S2-WROVER-DevKit-LiPo-USB comes with ESP32-S2-WROVER module with 4MB Flash and 2MB PSRAM. Power consumption of ESP32-WROVER-DevKit-Lipo is 65 uA in deep sleep mode.
ESP32-S2-WROVER-DevKit-LiPo-USB-EA comes with ESP32-S2-WROVER module with 4MB Flash and 2MB PSRAM, u.FL connector and 3dB external antenna.
ESP32-S2-DevKit-Lipo-USB can be programmed via the build in USB interface, but the board also has provision for external programmer like ESP-PROG for gang programming.
FEATURES
- ESP32-S2-WROOM WiFi/BLE module or ESP32-S2-WROVER module
- RGB user LED
- User button, Reset button
- Micro USB-OTG connector for powering and programming
- Can work as USB host or USB device
- PROG connector
- Built-in LiPo battery charger
- LiPo battery connector
- Battery measurement and power detection circuits
- Two columns of pins with headers soldered for easy access to all the board’s GPIOs
- Low-power design for extended operation on battery
- PCB dimensions: (1.9 x 1.1)" ~ (4.8 x 2.8)cm
- Operating temperature: -40+85C
DOCUMENTS
HARDWARE
SOFTWARE
- Arduino demo code - check DOCUMENTS section above for installation guide
- ESP-IDF has support for ESP32-S2
FAQ
- I can't program the board, it doesn't want to connect to the software. Drivers and environment seem fine. What can be the problem?
- Remember to put the board in bootloader mode. This is done manually via the buttons - press and hold button BUT1, press and release button RST1, release button BUT1. After programming is done, remember to manually reset the board via RST1 button to leave bootloader mode.


